Showing posts with label freezer. Show all posts

Saturday, September 19, 2015

Easy Freezer Meals

This month in our town it has been all about emergency preparedness.  With so much going on in the world, and disasters happening all over the place, even very close to home, we have been feeling a sense of urgency to work on our food storage. 

We were also counseled a couple of weeks ago to live within our means.  For me this meant that I needed to work on my budget.  The place we spend the most money is our food and unfortunately, even though I cook a lot, most of it takes place on the weekend.  During the week we are so guilty of eating out.  We eat out A-LOT!!!!  I mean a ridiculous amount.  So my sisters and I decided we would use recipes we already have, things we know our families love, and spend an afternoon making freezer meals. 

They are just nice to have on hand for all sorts of things.  Meals on the fly for when we are in a rush, or sick, or just don't feel like cooking. 

We chose 5 of our favorite dinners, 2 kinds of cookies, and 2 breakfast items.  We went shopping and kept the receipts because we wanted to be as accurate and we can be for those of your wanting to try it.

We also opted for the throw away pans, press n seal, heavy duty tin foil, and gallon size zip lock freezer bags for storage.


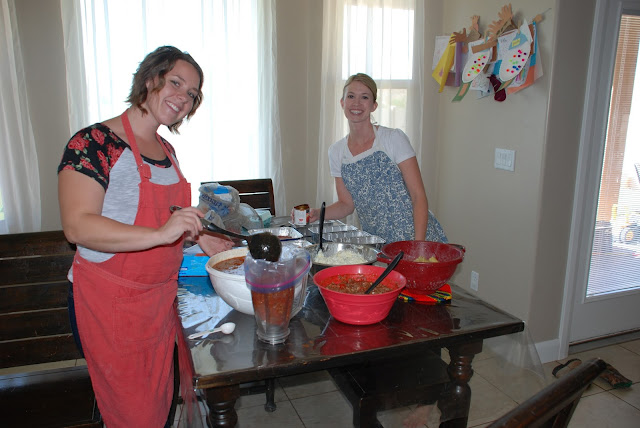
Before all the madness began, we stacked all of our groceries on the table.  We looked over our recipes and decided that one of us would start cooking our meats on the stove, while the other mixed her batch of cookies.   We had our sister Mary, and my daughters there helping us assemble things as we went along.
 Mary and Paige cooked the french toast sticks, while MaKady scooped the chocolate chip cookies onto the cookie sheets to be frozen. 
Meanwhile Tabitha put together the Shepherds Pie.


 After my batch of cookies I got my chicken enchiladas put together.


 We covered our pans with press n seal, then covered that with tin foil to help avoid freezer burn.

 We both shared the table so I could put together the lasagna and Tabitha scooped the chili into gallon size freezer bags.  We used freezer bags for things that don't need to bake in the oven in it's own container, like chili that will cook in a crock pot or on the stove, and Samoan chicken, which will get cooked on the grill.

 Next Tabitha made sugar cookies while I put together some breakfast burritos.

Here is what we made:

Shepherd's Pie - 3x this recipe (makes 48 servings)
Lasagna -2x this recipe (makes 38 servings)
Samoan Chicken - (makes 20 servings)
Chicken Enchiladas - 2x this recipe (makes 36 servings)
Chili - 3x this recipe (makes 60 servings)
Chocolate Chip Cookies (makes 6 dz, about 36 servings)
Sugar Cookies - 2x this recipe (makes 6 dz, 36 servings)
Breakfast Burritos - no recipe on this.  We scrambled 18 eggs, cooked 1 lb sausage, 1 lb bacon, 1 bag of cubed potatoes (in the freezer isle) and 30 flour tortillas.  Cook everything, mix together, then spoon into tortillas.  Roll and place in bags to freeze.  (makes 30 burritos, 30 servings)
French Toast Sticks - 2 loafs of bread, 18 eggs, a little bit of milk and cinnamon.  Cut each slice of bread into 3, dip in egg batter, then fry.  (Makes 8 dz, 24 servings)

In total, we have 328 servings of food.  Our groceries cost $150 for everything, with the exception of a few spices and flour that we already had on hand).

Each serving cost $0.46.  You guys!!!!  Seriously.  Compare that to what you would spend getting a pizza, which is about $1.00 per serving, or eating at McDonald's which is about $5.00 per serving.  You can see that a little bit of time is so worth it.

It took us 4 hours to get all this food done, and there were 4 of us working together.  Just a couple of notes:

1.  Plan ahead.
2.  Select meals that you know your family will eat.  It doesn't do anyone any good picking meals if your family won't eat them.
3.  Label your meals.  Write what it is, cooking instructions, and the date it was made.  
4.  Many hands make light work.

Now our freezers are full and we don't have to worry about spending money eating out.  Woohoo!!!

Pin It!

Wednesday, September 10, 2014

Raspberry-Peach freezer Jam


I was up in northern Utah over the weekend, spending quality time with my parents and a few siblings.  It was Brigham City's annual Peach Days celebration and the fruit stands that line the street in Perry were over flowing with baskets upon baskets of Peaches!  So naturally we got 2 boxes and shared with everyone and still had plenty to eat and can and freeze.  My husband and I took a little drive up to Logan to go to the dairy there and unfortunately it was closed for the day :(  bummer!!  But as we drove we noticed all of the raspberry stands along the road and got a bunch of those too.  Well peaches and raspberries are yummy together so today I am going to share with you our freezer jam recipe. 

Raspberry-Peach freezer Jam

about 3 cups raspberries (makes about 2-2 1/2 cups crushed) 
2 cups chopped peaches
7 cups granulated sugar
one box fruit pectin

Crush the raspberries, I put mine in the blender because I like smooth jam but a potato masher will do the trick if you like some fruit chunks.  Sieve out about half the seeds and put the rest into a big mixing bowl.  Peel, pit, and crush or chop the peaches, again I use a blender but small chopped pieces are good too.  Add peaches to the bowl with the raspberries and then add in the 7 cups of sugar. Stir it all together until the sugar is mixed in and let sit for 10 minutes, stirring every few minutes. Follow the directions on the box of fruit pectin. When the pectin is ready and your fruit sugar mixture has sat for 10 minutes add the pectin in and stir together.  Pour into jars, this recipe made about 5 pint jars, leaving at least 1/2 in head space.  Put lids on securely and let sit on the counter for 24 hours.  Freeze or if using refrigerate for up to 3 weeks.
Pin It!

Monday, June 2, 2014

Old-Fashioned Slush

When I was a kid we spent 6 weeks every summer living with my grandparents.  I loved when we got to finally visit them.  Summertime brought on all sorts of traditions, like our annual trip to Lagoon, and our
Independence Day fireworks show in the backyard, riding on the combine and tractor, earning pennies by pulling out sticker weeds, sneaking fresh raspberries off of the bushes (even though Grandma asked us not to touch them), climbing trees, playing in the ditch...honestly I could go on for days. 

This week, as the weather here is getting hotter I was searching through my recipes for summer ideas and I ran across our family recipe for slush.  The most wonderful memories of summer came flooding in.  My grandma was a saver.  By that I mean she saved everything and usually re-used it.  I remember her washing plastic sandwich bags with her dishes and then laying them out to dry.  Weird?  Maybe.  Thrifty?  Definitely.  She also saved every container.  I mean everything from the pickle jar to the plastic bucket that the ice-cream came in.

This was what came to my mind when I found the slush recipe.  I remember at almost every family event we had 2 things.  #1 homemade root beer, #2 homemade slush.  On a hot summer day when everyone was done eating my grandma would pull out the re-used ice cream bucket, which would be filled with frozen solid slush.  She would lovingly fill our little plastic cups with slush and then we would top them off with sprite or 7-up.  Then I would take my treat and head out to the swing.  I could multi-task back then.  I could swing and eat at the same time.  Some of the best memories I have involve food.  I hope you are all making memories as well.

 Old-Fashioned Slush
1 1/2 c water
1/2 c sugar
1 banana
1 1/2 c pineapple juice
1/2 c frozen orange juice concentrate
1 TBSP lemon juice

Add sugar to the water, stir, then let sit for a few minutes, then stir again till sugar dissolves.  (this only takes a few minutes).  In a blender combine banana, pineapple juice, and orange juice concentrate.  Cover, blend till smooth.  Add sugar/water mixture and lemon juice, blend for a minute.  Transfer to 9x13 baking pan.  Freeze for 4-24 hours. 

To serve, let mixture stand at room temperature for 15 minutes.  To form slush, scrape a large spoon across frozen mixture, spoon mixture into a glass, then pour sprite or 7-up over it.  Enjoy!!
Pin It!

Tuesday, May 20, 2014

Easy Strawberry Freezer Jam


I love this time of year! Great weather, school is getting out, the garden is on its way to making yummy food, and strawberries are ripe for the pickin'.  Sadly I don't have enough strawberry plants to make much more that a handful of strawberries at one time so I bought mine at Wal-Mart.  Costco is also having killer deals on them,  4.99 for a giant box!!  This is a super simple recipe and so yummy!  I was able to make one batch in less time then my kids took to eat their lunch. Kids were busy and I got some jam made...Win-win!

Easy Strawberry Freezer Jam

4c. Strawberries, hulled
4c. granulated sugar
1 pk. (2oz) unflavored powdered fruit pectin
3/4c. water
2 T. lemon juice

In a bowl crush the berries, or use your food processor or blender to make a thinner jam.
Stir in the sugar and let sit for 10 minutes, stirring occasionally.  In a small saucepan combine pectin and water, bring to a boil and stir constantly for 1 minute.  Remove from the heat- pour into berry mixture and add lemon juice.  Stir for 3 minutes or until sugar is dissolved and mixture is smooth.  Ladle jam into clean jars or freezer containers, leaving 1/2in head space.  Seal and label.  Let sit @ room temperature for 24 hours or until set.  Refrigerate up to 3 weeks or freeze up to a year.

-makes about 6 half pint jars
Pin It!