Showing posts with label Wood Craft. Show all posts

Sunday, July 3, 2016

DIY Welcome Sign

We've been in our house now for 2 years and most of the time my front porch looks a little sad.  I have fun decorations for most of the fall/winter holidays but not much for the rest of the year.  I wanted something pretty simple but also classy for the rest of the year. 

I've been completely in love with all the copper decor lately and knew that it was definitely one of the colors I wanted to incorporate into my decor.  I had been collecting rustic tins for a while, but thought I could give them a little makeover with some copper spray paint. 

My neighbor gave us a couple of pallets that she wasn't using and I knew we could make them into something cute.  My hubby and I spent a couple of hours ripping out nails and taking the pallets apart.  The first thing we made was the lantern.  I liked it so much that I decided we needed something for the other side of the door.  I had seen some cute welcome signs on Pinterest and it seemed perfect.


 It was much harder that I thought it would be to take these pallets apart, but it was worth the effort.

 For the sign, we used 2 boards that where pretty straight and not too dinged up for the front.  We left them the original length, which was about 4 feet long.  Then we cut a few boards into pieces(about 6 inches long) to use on the back as support.
 Next we clamped, glued, and nailed the smaller boards to the back of the 2 long boards.

 
 We secured the boards in 3 spots.  Then we let them dry.  I loved the color of the boards already because the pallet was from some bags of cement.  They had a slight grey color to them.  I sanded them a bit and used 2 coats of white wash over them to really make the knots and dings stand out, because I loved the character of the boards.  My daughter cut out the "welcome" letters on her cricket, but you could also use the paper and pen method that I've used in the past.


Pin It!

Saturday, October 10, 2015

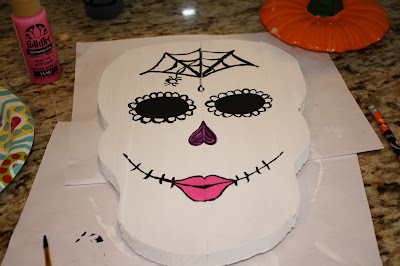
Wooden Skull Decoration DIY


Every year I make or buy a few new decorations for whatever holiday it is.  I dream of having every room in my house themed out for the holidays!!  Halloween is one of our favorites around here, mainly because that is the twins birthday.  (side note: They are going to be 5 this year!!!  Holy bananas time is flying!)


I needed something to put on my front door so I came up with this handsome fella.


My little girl wanted a girl skeleton so bad after seeing this guy that we just had to make one for her.  Of course its a smaller version and super girly but this is how we did it.

First get your wood.
I had scrap pieces lying around so for the big guy I used 3 big pieces and for the sugar skull (girl one) I used 4 small pieces, as shown in the picture below.
My Best friend came over and skipped the multiple pieces and had a giant piece of plywood  (which led to an awesome textured paint job).
Anyway you want to do it is great, my whole goal with these was to use what I had on hand so both skulls cost me $0.!!


After you acquire what wood you will be using, roughly draw a skull outline.


Then comes time to bring out the power tools.!
For big guy I used a jigsaw, but for the smaller pieces I used a band saw.

(use safety goggles and watch your fingers!)


Make sure as you are cutting, the pieces line up as best as you can.


to attach the pieces together you could go and buy the flat brackets which work wonders, but for the sake of using what I had, I opted for drilling a angled hole...


And screwing the pieces together...


Then you want to sand the edges to get a smooth finish..  I skipped this part because I wanted it to be a bit edgy ...


Next set up your paint work station and bring in your little helper.  Mine happened to be wearing my old sparkly dance costume via.. 1998 (we danced to the song pretty women, it was fantastic.)

After painting it the base coat she ran off to change into another costume and I got to work on the Sugar skull art.


For the sugar skull look, Just keep adding until its fancy enough for you!  I am by no means and artist but I'm great at copying so I looked at pinterest for a lot of my inspiration, and mixed and matched paint ideas.  I also drew lightly with a pencil before I painted to make sure its what I wanted.  Here is step by step through pictures, enjoy!!!..
.
.
.
.


{For the sugar skull I used a mixture of acrylic pain and also fabric puff paint to get the raised dots}

{For big guy I did the same white base coat and then made a line of paint on a paper plate, dolloping glow in the dark, white, black, glow in the dark again, and silver.  As I painted I would touch the brush in two dollops at the same time and do long strokes and then move to the next to colors until I got my desired look... Then I finished by painting the eyes, nose and mouth.}

For a fun finish on the sugar skull I pulled out my scrap ribbon bag and hot glued a bunch together for this over the top bow,  then I hot glued it into place.


To finish off your skull, you can add picture hanging hooks, on big guy I did picture wire and for the sugar skull I didn't put anything because baby girl insists on having it in her room on a shelf by her littlest pet shop house.

 And then TA-DA!!  It is finished and now you have an awesome new addition to you Halloween decor!


Pin It!

Friday, November 14, 2014

Thanksgiving Turkeys-- wooden block craft


My cute neighbor/BFF had such a great project in mind for Thanksgiving this year!  And she so graciously let me borrow it for the blog, and she even gave me the stuff for it... and painted it!  Thanks Danielle for making this craft super easy! ;)


You will first need a block of wood,  I made big ones out of 2x6x6 and small ones out of 2x4x4.  And spray paint them brown.


Other supplies you will need are:  googly eyes
                                                      2in fabric circles (about 22 for big blocks and 16 for little)
                                                      yellow and red pipe cleaners
                                                       hot glue
                                                       and scissors

start by tipping your turkey face down, put a dab of hot glue close to the top...


Take one of the circles of fabric and pinch one end together...


Then place the pinched end on the hot glue...


Keep repeating the process until you have used half of your circles and have one layer down...


Then use the rest of the fabric and do a second layer...


When you are done it will look like this.


Next you will hot glue on the eyes.  Cut and shape the pipe cleaners and glue them on as well.


All finished!  And I have one for each member of my family,.  --- For the girls I twisted 2 circles of fabric together and hot glued on the turkeys forehead for a bow!


Pin It!