Showing posts with label DIY. Show all posts

Sunday, July 3, 2016

DIY Welcome Sign

We've been in our house now for 2 years and most of the time my front porch looks a little sad.  I have fun decorations for most of the fall/winter holidays but not much for the rest of the year.  I wanted something pretty simple but also classy for the rest of the year. 

I've been completely in love with all the copper decor lately and knew that it was definitely one of the colors I wanted to incorporate into my decor.  I had been collecting rustic tins for a while, but thought I could give them a little makeover with some copper spray paint. 

My neighbor gave us a couple of pallets that she wasn't using and I knew we could make them into something cute.  My hubby and I spent a couple of hours ripping out nails and taking the pallets apart.  The first thing we made was the lantern.  I liked it so much that I decided we needed something for the other side of the door.  I had seen some cute welcome signs on Pinterest and it seemed perfect.


 It was much harder that I thought it would be to take these pallets apart, but it was worth the effort.

 For the sign, we used 2 boards that where pretty straight and not too dinged up for the front.  We left them the original length, which was about 4 feet long.  Then we cut a few boards into pieces(about 6 inches long) to use on the back as support.
 Next we clamped, glued, and nailed the smaller boards to the back of the 2 long boards.

 
 We secured the boards in 3 spots.  Then we let them dry.  I loved the color of the boards already because the pallet was from some bags of cement.  They had a slight grey color to them.  I sanded them a bit and used 2 coats of white wash over them to really make the knots and dings stand out, because I loved the character of the boards.  My daughter cut out the "welcome" letters on her cricket, but you could also use the paper and pen method that I've used in the past.


Pin It!

Monday, April 25, 2016

Ultimate Lego Storage

Let's take a minute to talk about Lego's.  They are fantastic!!  Aren't they?  Here's the problem, at least at my house.  My son is 7.  His absolute favorite toy is Lego's.  He gets them for Christmas, and Birthdays and for doing extra chores around the house and...you can see the problem.  He has so many sets but for a long time we haven't had a good way to store them.

We live in a small house.  No basement, no extra bedrooms or a playroom, and not much closet space.  Our kids have to keep their toys in their bedrooms.  Most of their toys are packed tightly in their closets.  Toys & clothes & shoes all kept in a tiny closet.  We've tried storage bins and a toy box, but things still get jumbled.  Then there is the issue of trying to keep Lego sets together. 

Honestly here is our Lego routine.  My son gets a set of Lego's, builds it once, then I try to put it in a zip lock bag with the instructions, but somehow most of the Lego's end up in a little blue container in his closet with instructions floating all over the place.    He has tons of Lego's, but it seems like every single time we go to the store he is begging for another set.  (Don't worry, I usually don't give in).  I couldn't understand why he kept asking for more sets when he already had so many.  Then it sort of occurred to me...trying to build something when you have to dig through hundreds of Lego's to find the right pieces was a daunting task, especially for a little boy.  It was easier to just get a new set.

I decided to find a better way to store his Lego's.  I found tons of great ideas online, but our space is limited and I really wanted to keep each set together.  I remember when my girls where little we used to keep a lot of their toys in containers under their beds.  I found a big flat container made to fit under a bed.  It had wheels and was light enough for him to lift.    Once I had the big container I went in search of some smaller containers to fit inside.  Our Walmart happened to have pencil boxes for less than a $1 and they happened to fit perfectly inside the box. 


I pulled out all of his Lego's.  The storage bin we already had some in, every instruction booklet I could find, every set still in a box, and also those in zip lock bags.  At first it didn't seem too bad.


Not bad right?  Ha!!  You would be amazed to know how many bazillion Lego's fit inside that blue container.   I started by laying each booklet out.  Then I went through each booklet and found all the pieces to make that set.  1 hour turned into 5 turned into 2 straight days of sorting Lego's.  2 days.  Think about that.  If it took me that long to sort these Lego's, think about how long it would take a 7 year to build something with all of his Lego's jumbled together like that.  Frustrating right?!! 


After 2 very long days I was done.  Each small container holds one set - pieces and instructions.


As soon as I was finished, I had a happy little boy busy putting together each set, then cleaning up and putting that set away before moving onto the next.  He kept saying how cool it was.  Now I have a happy boy and a happy momma because the Lego's are finally, finally under control.  Plus we have plenty of space for more sets in the future so this storage will work for a long time with his growing Lego collection.


As a side note, the large container was about $17.00 at my local Walmart and each pencil box was $1.00.  The large container can hold 28 pencil boxes.  So this project cost me just under $50. 


Pin It!

Friday, November 27, 2015

Holiday Photo Book

I have this habit of doing all of my deep cleaning in the fall before the holidays.  This year my goal was to tackle the "junk" closet.  I'll be honest, I've been kind of dreading it.  I kept putting it off and stacking more and more junk in there and finally I could hardly open the door without stuff falling out.  It was way, way past time to get it cleaned out.

Finally I got around to it.  One of the things I keep in this closet are boxes of old pictures and school papers and stuff.  I started going through each box and pretty soon I realized, that although I haven't been very consistent on anything in my many years as a mom/wife, the one thing we have done is taken a picture each Halloween and made Christmas cards each Christmas.  But here they were stacked in a box, years and years of pictures and cards neatly tucked away.  I wanted them out.  I wanted my family to enjoy them.

Here's my sad confession though: I don't scrap book.  I used to do it begrudgingly, but I really have never enjoyed it.  Then came along the Internet and shutterfly and photo books and tada!!  My easy fun way to create a scrapbook for the kids.  Lazy, of course, but at least it was getting done.  However, I still had this stack of Halloween pictures and another one of Christmas cards and I wanted to do something with them,

I remembered a couple of years ago when we took the kids to Disneyland, we had made our own autograph books.  They were super easy and so cute.  Plus the pages were nice and thick and they were very sturdy.  I thought that method would be perfect for making some super easy holiday photo books.


Items Needed:

1 spiral bound sketchbook
Scrapbook paper
Ribbon
Scissors
Glue Stick
Photo corners
Your family pictures and cards


The sketchbooks from Barnes and Noble are perfect for this project.  The pages are thick and durable, and they are acid free to protect your pictures.  They come in all sizes and start at $3.  Plus they have lots of pages in them so you can add to them for many years to come.

Take the scrapbook paper and cut a piece out that is the same size as the front of the book.  Use the glue stick, glue the paper to the front cover.  Use any other decorations you want at this time.  Then do the same for each page.  Glue in a piece of scrapbook paper, then use the photo corners to attach each picture and card.  You can hand write the year if you want (I printed mine on the computer, then glued them in).  Use your creativity and imagination.


To finish up each book, cut a strip of ribbon, long enough to tie in a knot and have a little hanging out  about 2 inches past the edge of the book (this will vary depending on the size of your book and the look you are going for).  Melt the edges of the ribbon with a lighter to seal the ribbon and stop the ribbon from fraying,  Then tie the ribbon on the spiral part of the sketchbook.


That's all.  Easy!  Each book took me about an hour.  But my kids have loved these books so far.  They have pulled them down off the bookshelf several times now.  It's been fun to have our pictures available for them to look through and remember little stories from each year.


Pin It!

Saturday, October 10, 2015

Wooden Skull Decoration DIY


Every year I make or buy a few new decorations for whatever holiday it is.  I dream of having every room in my house themed out for the holidays!!  Halloween is one of our favorites around here, mainly because that is the twins birthday.  (side note: They are going to be 5 this year!!!  Holy bananas time is flying!)


I needed something to put on my front door so I came up with this handsome fella.


My little girl wanted a girl skeleton so bad after seeing this guy that we just had to make one for her.  Of course its a smaller version and super girly but this is how we did it.

First get your wood.
I had scrap pieces lying around so for the big guy I used 3 big pieces and for the sugar skull (girl one) I used 4 small pieces, as shown in the picture below.
My Best friend came over and skipped the multiple pieces and had a giant piece of plywood  (which led to an awesome textured paint job).
Anyway you want to do it is great, my whole goal with these was to use what I had on hand so both skulls cost me $0.!!


After you acquire what wood you will be using, roughly draw a skull outline.


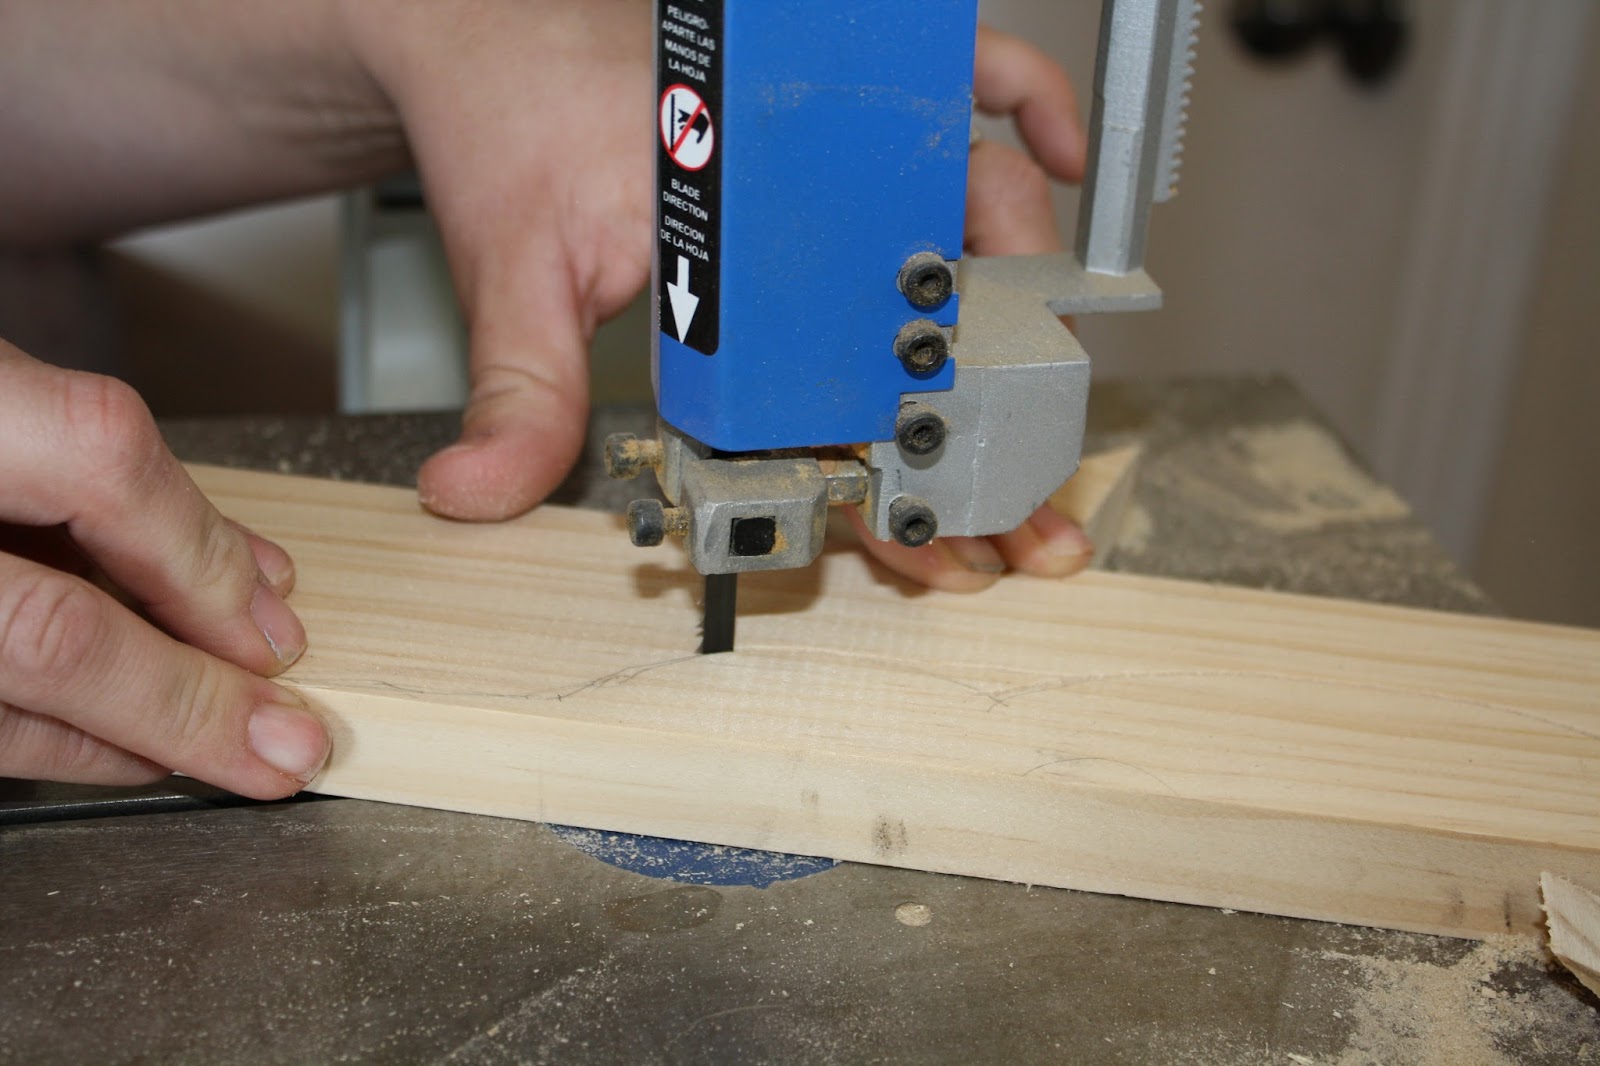
Then comes time to bring out the power tools.!
For big guy I used a jigsaw, but for the smaller pieces I used a band saw.

(use safety goggles and watch your fingers!)


Make sure as you are cutting, the pieces line up as best as you can.


to attach the pieces together you could go and buy the flat brackets which work wonders, but for the sake of using what I had, I opted for drilling a angled hole...


And screwing the pieces together...


Then you want to sand the edges to get a smooth finish..  I skipped this part because I wanted it to be a bit edgy ...


Next set up your paint work station and bring in your little helper.  Mine happened to be wearing my old sparkly dance costume via.. 1998 (we danced to the song pretty women, it was fantastic.)

After painting it the base coat she ran off to change into another costume and I got to work on the Sugar skull art.


For the sugar skull look, Just keep adding until its fancy enough for you!  I am by no means and artist but I'm great at copying so I looked at pinterest for a lot of my inspiration, and mixed and matched paint ideas.  I also drew lightly with a pencil before I painted to make sure its what I wanted.  Here is step by step through pictures, enjoy!!!..
.
.
.
.


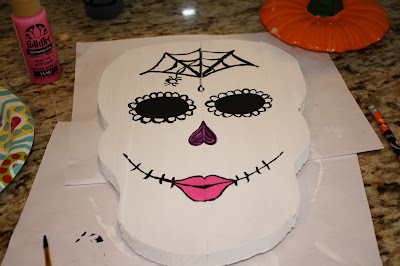
{For the sugar skull I used a mixture of acrylic pain and also fabric puff paint to get the raised dots}

{For big guy I did the same white base coat and then made a line of paint on a paper plate, dolloping glow in the dark, white, black, glow in the dark again, and silver.  As I painted I would touch the brush in two dollops at the same time and do long strokes and then move to the next to colors until I got my desired look... Then I finished by painting the eyes, nose and mouth.}

For a fun finish on the sugar skull I pulled out my scrap ribbon bag and hot glued a bunch together for this over the top bow,  then I hot glued it into place.


To finish off your skull, you can add picture hanging hooks, on big guy I did picture wire and for the sugar skull I didn't put anything because baby girl insists on having it in her room on a shelf by her littlest pet shop house.

 And then TA-DA!!  It is finished and now you have an awesome new addition to you Halloween decor!


Pin It!