Every year I make or buy a few new decorations for whatever holiday it is. I dream of having every room in my house themed out for the holidays!! Halloween is one of our favorites around here, mainly because that is the twins birthday. (side note: They are going to be 5 this year!!! Holy bananas time is flying!)
I needed something to put on my front door so I came up with this handsome fella.
My little girl wanted a girl skeleton so bad after seeing this guy that we just had to make one for her. Of course its a smaller version and super girly but this is how we did it.
First get your wood.
I had scrap pieces lying around so for the big guy I used 3 big pieces and for the sugar skull (girl one) I used 4 small pieces, as shown in the picture below.
My Best friend came over and skipped the multiple pieces and had a giant piece of plywood (which led to an awesome textured paint job).
Anyway you want to do it is great, my whole goal with these was to use what I had on hand so both skulls cost me $0.!!
After you acquire what wood you will be using, roughly draw a skull outline.
Then comes time to bring out the power tools.!
For big guy I used a jigsaw, but for the smaller pieces I used a band saw.
(use safety goggles and watch your fingers!)
Make sure as you are cutting, the pieces line up as best as you can.
to attach the pieces together you could go and buy the flat brackets which work wonders, but for the sake of using what I had, I opted for drilling a angled hole...
And screwing the pieces together...
Then you want to sand the edges to get a smooth finish.. I skipped this part because I wanted it to be a bit edgy ...
Next set up your paint work station and bring in your little helper. Mine happened to be wearing my old sparkly dance costume via.. 1998 (we danced to the song pretty women, it was fantastic.)
After painting it the base coat she ran off to change into another costume and I got to work on the Sugar skull art.
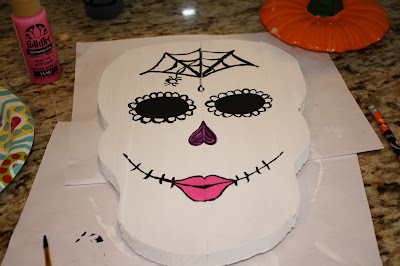
For the sugar skull look, Just keep adding until its fancy enough for you! I am by no means and artist but I'm great at copying so I looked at pinterest for a lot of my inspiration, and mixed and matched paint ideas. I also drew lightly with a pencil before I painted to make sure its what I wanted. Here is step by step through pictures, enjoy!!!..
.
.
.
.


{For the sugar skull I used a mixture of acrylic pain and also fabric puff paint to get the raised dots}
{For big guy I did the same white base coat and then made a line of paint on a paper plate, dolloping glow in the dark, white, black, glow in the dark again, and silver. As I painted I would touch the brush in two dollops at the same time and do long strokes and then move to the next to colors until I got my desired look... Then I finished by painting the eyes, nose and mouth.}
For a fun finish on the sugar skull I pulled out my scrap ribbon bag and hot glued a bunch together for this over the top bow, then I hot glued it into place.
To finish off your skull, you can add picture hanging hooks, on big guy I did picture wire and for the sugar skull I didn't put anything because baby girl insists on having it in her room on a shelf by her littlest pet shop house.


No comments:
Post a Comment