Monday, September 28, 2015

Halloween Subway Art Sign

I know, I know, it's not quite October 1st, but I just couldn't help myself.  I've been planning and waiting to get my Halloween decorations up and this weekend I finally got it done.   I wanted something a little different this year and decided that I loved the idea of classic black and white decor.  I only had the wreath from last year.  So I didn't have much to go on.   I did have a bunch of leftover stuff from past projects that I figured I would use.


I've saw this little saying somewhere and I thought it would look so cute on my porch.  I went out to my craft room (actually my garage...) I had a 2 1/2 foot board left over from my sons industrial shelves and some flat black spray paint that my husband used for something.  The only thing I purchased for this project was a couple of white paint markers, I found for $2 each at my local Walmart.  I got 1 with a fine tip, and 1 with a medium tip.  So this project cost me $4.  Not bad, not bad.


I sanded the raw edges of the board and put it down on a piece of plastic.  Then I went a little crazy with the black paint.  I also used it to paint a couple of old candlesticks I had that were just hanging out in a closet, and a lantern that I found in the Easter clearance section at Tai Pan Trading for 
75% off.  


Once I got the board painted black I had to decide how I wanted to put the words on the board.  I don't have a cricket and I didn't want to pay a bunch of money to have vinyl cut so I used a technique I have used before.   I used my computer and Microsoft word and printed out  the words that I wanted.  No special fonts here either, just basic ones that were on word.  


Next I cut out each word strip and placed them on the board where I wanted them to be.  (My printer is almost completely out of ink and I did not want to run to the store at 11pm, so my words were barely visible.)  Use what you have right?!!!  Anyway, after  I got the words placed where I thought they should go, I took a pen and traced each letter.  When you do this, you need to remember to push down a little bit, as this will leave an indent in the wood, which you want.


After I traced the words, I removed my paper.  You can just barely see the indent that it leaves, but it's exactly what you want.


Next I took my paint marker and colored in the letters left when I traced the words.  It's not perfect, but that's ok.  This process takes a little bit of time but it looks so nice afterward.


When I had all the words written on the board I put a layer of clear coat over it and let it dry.  That's it.  Easy, cute, Halloween Subway Art Sign for about $4.  


Pin It!

Thursday, September 24, 2015

Zesty Oven Roasted Beets

When I first started dating my husband I quickly discovered he was the pickiest eater on the planet.  His main food groups where cold cereal, meat and potatoes.  Also, he flat out told me he didn't like any ones cooking but his Grandma's.    I had some seriously big shoes to fill.

We dated for 3 years and during that time I hardly ever cooked for him.  He ate out a lot and he lived on cold cereal.  Then when we finally got married (3 years of dating is considered a really, really, really long time here in Utah), I told him that eating out was going to be a rare occasion and that I would be cooking dinner at home every night.

I'm not going to lie, it was a rough start.  Most of the time I would cook something and he wouldn't even try it.  He would just pour himself a bowl of cereal and my daughter and I would eat dinner alone.  It got old really fast.  One day I told him that I wouldn't be buying cereal anymore and if he didn't eat dinner with us then he could starve.  (I've never been afraid to speak my mind).

He said he would "try."  Which was a start.

Since my mom is the best cook out there, I grew up with a love of all foods.  She made everything from scratch.  I mean literally, everything from yogurt to condiments.  Amazing lady I tell ya.  She was also so good at having us try everything.

My husband however, grew up in a small farm town.  They ate what they could grow and what they could kill.  So he never had even tried rice or any kind of vegetable besides cor, green beans, and peas.

That was 17 years ago, and I'm happy to say that he now thinks I'm a pretty dang good cook (though I will never be as good as his Grandma), and he is very willing to try ANYTHING I make.

We have been working on different vegetables to incorporate into our diet.  When I was at the grocery store the other day I saw the most beautiful beets.  (I love beets).  I decided to bring them home and create something amazing for my family.  Some of the kids liked them and some didn't (if I'm being honest).  But it's a start.  Keep working with your kids (husbands).  Have them try new things.  Eventually their picky pallet will go away.


Zesty Oven Roasted Beets
3 beets
2 TBSP Zesty Italian Dressing
Sea Salt

Cut tops off beets, then peel and cube.  In a small bowl toss beets with Italian dressing.  Spread in an 8x8 square pan, prepared with non-stick cooking spray.  Bake in 425 oven for 40 minutes, or until beets are fork tender.  Sprinkle with sea salt just before serving.  (Serving Size - 2)


Pin It!

Saturday, September 19, 2015

Easy Freezer Meals

This month in our town it has been all about emergency preparedness.  With so much going on in the world, and disasters happening all over the place, even very close to home, we have been feeling a sense of urgency to work on our food storage. 

We were also counseled a couple of weeks ago to live within our means.  For me this meant that I needed to work on my budget.  The place we spend the most money is our food and unfortunately, even though I cook a lot, most of it takes place on the weekend.  During the week we are so guilty of eating out.  We eat out A-LOT!!!!  I mean a ridiculous amount.  So my sisters and I decided we would use recipes we already have, things we know our families love, and spend an afternoon making freezer meals. 

They are just nice to have on hand for all sorts of things.  Meals on the fly for when we are in a rush, or sick, or just don't feel like cooking. 

We chose 5 of our favorite dinners, 2 kinds of cookies, and 2 breakfast items.  We went shopping and kept the receipts because we wanted to be as accurate and we can be for those of your wanting to try it.

We also opted for the throw away pans, press n seal, heavy duty tin foil, and gallon size zip lock freezer bags for storage.


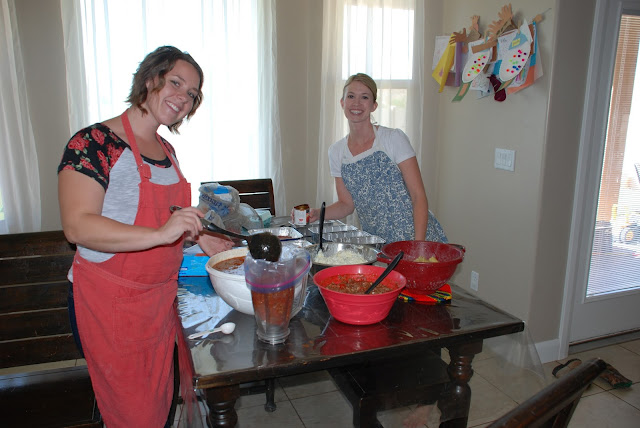
Before all the madness began, we stacked all of our groceries on the table.  We looked over our recipes and decided that one of us would start cooking our meats on the stove, while the other mixed her batch of cookies.   We had our sister Mary, and my daughters there helping us assemble things as we went along.
 Mary and Paige cooked the french toast sticks, while MaKady scooped the chocolate chip cookies onto the cookie sheets to be frozen. 
Meanwhile Tabitha put together the Shepherds Pie.


 After my batch of cookies I got my chicken enchiladas put together.


 We covered our pans with press n seal, then covered that with tin foil to help avoid freezer burn.

 We both shared the table so I could put together the lasagna and Tabitha scooped the chili into gallon size freezer bags.  We used freezer bags for things that don't need to bake in the oven in it's own container, like chili that will cook in a crock pot or on the stove, and Samoan chicken, which will get cooked on the grill.

 Next Tabitha made sugar cookies while I put together some breakfast burritos.

Here is what we made:

Shepherd's Pie - 3x this recipe (makes 48 servings)
Lasagna -2x this recipe (makes 38 servings)
Samoan Chicken - (makes 20 servings)
Chicken Enchiladas - 2x this recipe (makes 36 servings)
Chili - 3x this recipe (makes 60 servings)
Chocolate Chip Cookies (makes 6 dz, about 36 servings)
Sugar Cookies - 2x this recipe (makes 6 dz, 36 servings)
Breakfast Burritos - no recipe on this.  We scrambled 18 eggs, cooked 1 lb sausage, 1 lb bacon, 1 bag of cubed potatoes (in the freezer isle) and 30 flour tortillas.  Cook everything, mix together, then spoon into tortillas.  Roll and place in bags to freeze.  (makes 30 burritos, 30 servings)
French Toast Sticks - 2 loafs of bread, 18 eggs, a little bit of milk and cinnamon.  Cut each slice of bread into 3, dip in egg batter, then fry.  (Makes 8 dz, 24 servings)

In total, we have 328 servings of food.  Our groceries cost $150 for everything, with the exception of a few spices and flour that we already had on hand).

Each serving cost $0.46.  You guys!!!!  Seriously.  Compare that to what you would spend getting a pizza, which is about $1.00 per serving, or eating at McDonald's which is about $5.00 per serving.  You can see that a little bit of time is so worth it.

It took us 4 hours to get all this food done, and there were 4 of us working together.  Just a couple of notes:

1.  Plan ahead.
2.  Select meals that you know your family will eat.  It doesn't do anyone any good picking meals if your family won't eat them.
3.  Label your meals.  Write what it is, cooking instructions, and the date it was made.  
4.  Many hands make light work.

Now our freezers are full and we don't have to worry about spending money eating out.  Woohoo!!!

Pin It!

Wednesday, September 9, 2015

Chocolate Zucchini Bread

The kids are back in school and our summer is winding down.  The air is turning colder, and the days are getting shorter and fall is well on it's way.  But, the zucchini...it is still going strong around here. 

We decided to try something a little different this time with our zucchini.  I still wanted my kids to eat it, because it's a fantastic vegetable.  But I wanted something fun  and sweet for a treat instead of our standard zucchini bread.

I searched through some of my cookbooks and found a recipe for zucchini bread and thought it would be amazing if it was chocolate.  So I left out 1/2 c of flour and replaced it with cocoa powder and added chocolate chips.

The end result is amazing.  The whole family loves it, which is always my goal when trying a new recipe.  This one is definitely a keeper.


Chocolate Zucchini Bread
3 eggs
1 c oil
1 TBSP vanilla
1 c granulated sugar
1 c brown sugar
1 tsp salt
1/2 tsp baking powder
1 tsp baking soda
1 TBSP cinnamon
1/2 c cocoa powder
2 1/2 c flour
2 c grated zucchini (not peeled, unless its a bigger zucchini, you might want to remove the seeds)
1 bag milk chocolate chips (about 2 cups)

In a bowl, beat together eggs, oil, vanilla, and sugars.  Add salt, baking powder, soda, cinnamon and cocoa.  Mix till well blended.  Then add zucchini and flour, mixing until all combined.  Stir in chocolate chips.  Pour into two loaf pans, greased.  Bake at 325 for 1 hour.

*As a side note, zucchini freezes really well.  I usually just cut mine open, remove the seeds, then grate it.  I store it in freezer, zip lock bags in 2 cup measurements.  That way you can have zucchini ready all winter long when you feel like making a treat.
Pin It!